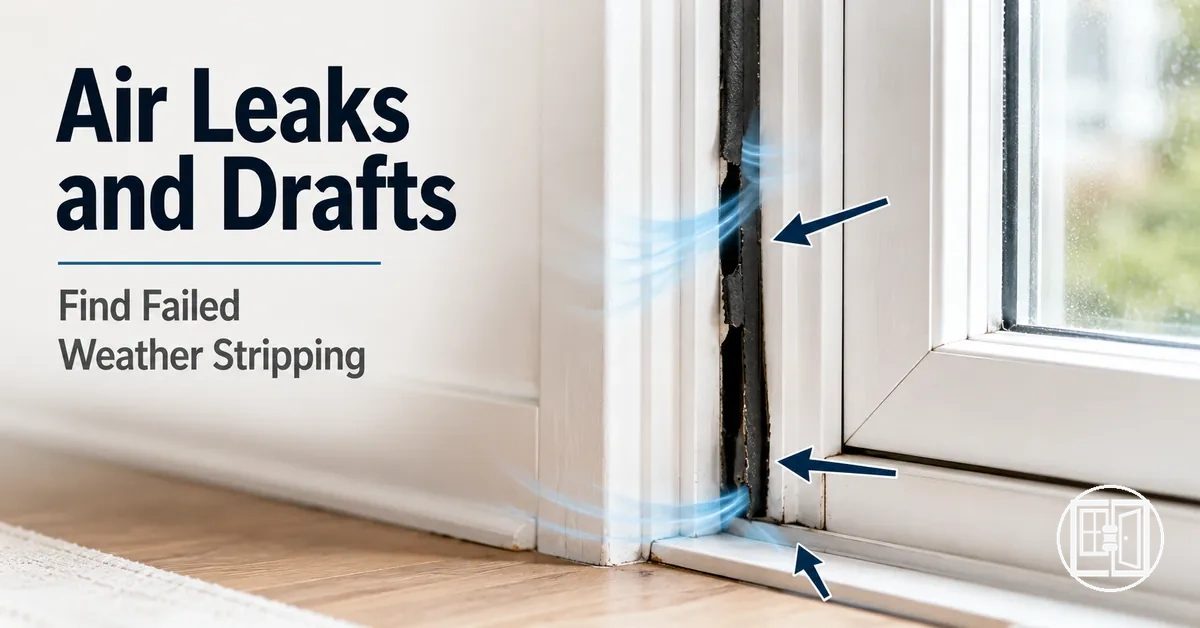
Window and Door Weather Stripping Air Leak Troubleshooting
Window and door weather stripping air leaks refer to draft conditions where air passes through or around weather stripping due to reduced seal contact between the strip and the door frame or window frame. This usually happens when compression is no longer consistent, when a worn seal loses its shape, or when a gap forms between the sealing surface and the frame. These conditions create a leak path that allows moving air to enter or exit around the edges rather than being blocked by the seal. The main diagnostic frame for these issues is failed seal contact.
When seal contact weakens, drafts can appear around door frames and window frames as localized or continuous air movement depending on the size and position of the gap. A worn seal or poor fit does not always mean complete failure, but it can reduce compression enough to allow intermittent air leak behavior. In many cases, the outcome depends on how the material responds to closing pressure and how consistently the seal strip maintains contact along the frame.
Diagnosis starts with identifying symptoms such as cold air movement, light gaps, or loose seal contact. These signals are then connected to possible causes like compression loss, worn material, or alignment issues in the door or window frame. From there, leak location checks help determine where the air path is forming, followed by criteria for deciding whether adjustment, correction, or replacement may be needed depending on conditions.
Not all air movement around doors and windows is caused by weather stripping failure. In some cases, the leak path may come from fixed frame gaps, caulk failures, glass perimeter spacing, or structural openings that are outside the weather stripping contact zone. These boundary conditions require separate consideration because they do not depend on compression or seal strip contact, even though they may produce similar draft symptoms.
How Weather Stripping Air Leaks Create Door and Window Drafts
Weather stripping air leaks refer to conditions where air movement occurs because seal contact between the weather stripping and the door frame or window frame is reduced or broken. This happens when compression is no longer consistent or when frame continuity is interrupted by small gaps along the sealing line. In this state, air can pass through a developing leak path, producing door drafts and window drafts depending on exposure and pressure differences. Seal contact is the controlling condition that determines whether air is blocked or allowed to move through the edge.
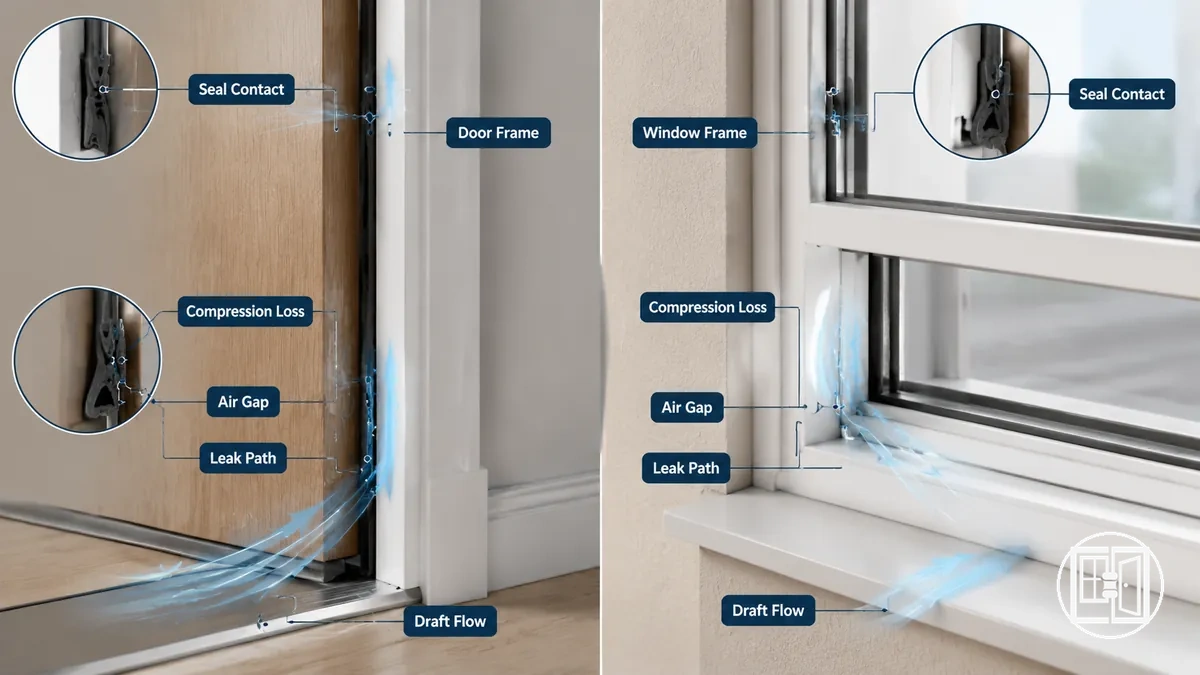
The mechanism of weather stripping air leaks follows a clear sequence: weather stripping condition affects compression, compression controls seal contact, and seal contact determines whether a leak path forms along the door frame or window frame. When compression weakens due to wear or poor fit, gaps can open at points where the strip no longer maintains continuous pressure. This can lead to air movement that carries dust, noise, or comfort changes, depending on gap size and frame continuity rather than a single fixed outcome.
How Weather Stripping Air Leaks Create Door and Window Drafts can also be understood by separating seal-based movement from non-seal sources. Seal-related leaks depend on contact and compression, while other air movement may originate from thresholds, glass edges, surrounding caulk, or fixed frame gaps that are not controlled by weather stripping behavior.
Weather Stripping Leak Symptoms Around Doors and Windows
Weather stripping leak symptoms around doors and windows usually indicate reduced seal contact where weather stripping no longer maintains consistent compression against the door frame or window frame. This condition can allow air movement through small gaps, but the symptoms are only clues and not definitive proof of failure. In many cases, uneven compression or loose contact creates early indicators of a developing air leak.
These symptoms can be grouped by what you feel, see, hear, or notice at the contact points. Cold air movement along edges, visible light through small gaps, dust trails near the seal strip, and noise changes are common observational signals. Loose contact and uneven compression often appear at the same time, especially near the bottom edge or corner of a door or window frame, so confirmation usually requires checking more than one sign rather than relying on a single observation.

To help identify patterns, weather stripping leak symptoms around doors and windows should be grouped by what the user can feel, see, hear, or notice indoors before moving to confirmation checks.
Weather stripping leak symptoms around doors and windows are best reviewed through a structured checklist that highlights observable conditions without treating any single sign as conclusive.
- Cold air movement along door or window edges indicating possible seal contact loss
- Visible light passing through small gaps at the frame
- Dust presence collecting near loose seal strip areas
- Noise changes caused by air passing through a leak path
- Loose contact where weather stripping no longer presses evenly
- Uneven compression along sections of the frame
- Seasonal draft changes that appear stronger at bottom edge or corner points
Cold Air Movement Around Door Edges and Window Frames
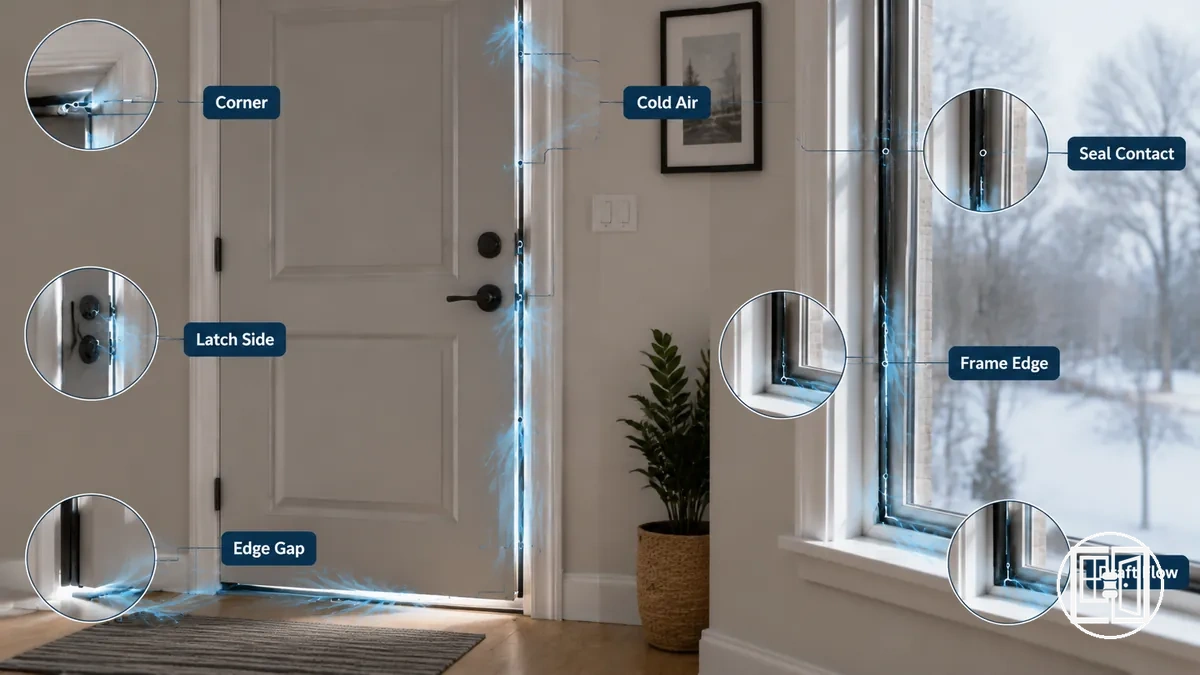
Cold air movement around a door edge or window frame is a localized symptom that can indicate reduced seal contact at a specific frame contact point. When moving air is consistently felt along these edges, it often suggests that the weather stripping is not maintaining stable compression. This creates a possible contact gap where air passes through the seal line rather than being blocked.
Cold air should be checked by location because different edges can behave differently depending on how the frame contact is distributed. Comparing where the moving air appears helps narrow down whether the issue is isolated or spread across multiple seal points.
- Top side where reduced compression may allow subtle air movement along the upper frame
- Latch side where loose seal contact can create a noticeable draft path
- Bottom edge where uneven pressure may lead to stronger cold air flow
- Corner where small alignment gaps can concentrate moving air
Confirming the exact location of cold air movement helps relate the symptom back to seal contact conditions without assuming a single cause.
Light, Dust, Noise, and Loose Contact Near Sealed Edges
Light gap, dust trail, noise, and loose contact near a sealed edge are indirect symptoms that may suggest reduced weather stripping contact along a door or window frame. When these signs appear at a sealed edge, they indicate possible contact loss at a specific strip section rather than confirming a full seal failure. These observations act as supporting evidence that the sealing condition may be inconsistent across the frame.

Light, dust, noise, and loose contact near sealed edges should be interpreted as indirect indicators that require confirmation because alignment issues, glass movement, or frame conditions can also produce similar effects. A moving-air test can help distinguish whether these surface signs align with actual air passage through the seal.
These secondary symptoms are best understood as grouped evidence near the sealed edge rather than isolated proof.
- Light gap where small visible openings appear along the sealed edge
- Dust trail that forms near areas of reduced contact
- Noise changes caused by minor air movement through gaps
- Loose contact where strip section no longer touches the frame consistently
- Rattling that can occur when pressure at the seal contact point weakens
Common Causes of Drafty Weather Stripping
Drafty weather stripping occurs when the sealing system loses effectiveness due to wear, fit mismatch, or application-related issues. In most cases, the problem can be traced back to worn material, compression loss, missing section, wrong profile, door alignment issues, dirty surface conditions, or loose tape. These causes explain why weather stripping becomes drafty by separating material wear, fit accuracy, and adhesion or installation failure into distinct categories.
Each cause can be interpreted using an EAV (entity–attribute–value) structure where the cause links to a specific seal part, a failure condition, and a resulting effect on air sealing. For example, worn material or compression loss reduces sealing pressure, a wrong profile can prevent proper edge contact, while dirty surfaces or loose tape reduce adhesion and create partial lifting along the frame. This structured view helps distinguish where contact loss originates before moving toward targeted leak testing rather than general inspection.
Common Causes of Drafty Weather Stripping are easier to analyze when grouped by seal part, failure condition, and resulting effect.
| Cause | Seal part or condition | What to check | Likely effect |
|---|---|---|---|
| Worn material | Compressed or aged strip section | Flattening, cracks, reduced elasticity | Reduced sealing contact and air leakage points |
| Compression loss | Door or window contact edge | Uneven closure pressure or weak contact | Intermittent draft paths along frame |
| Missing section | Detached or broken strip area | Visible gaps in sealing line | Direct air entry points |
| Wrong profile | Seal shape mismatch with frame | Poor edge fit or uneven compression | Persistent edge gaps |
| Door alignment | Frame positioning and latch side | Uneven closing or misaligned contact | Uneven sealing pressure distribution |
| Dirty surface | Adhesive contact area | Dust, grease, or residue on frame | Weak adhesion and partial lift |
| Loose tape | Adhesive-backed strip section | Peeling edges or reduced stickiness | Air path under lifted strip |
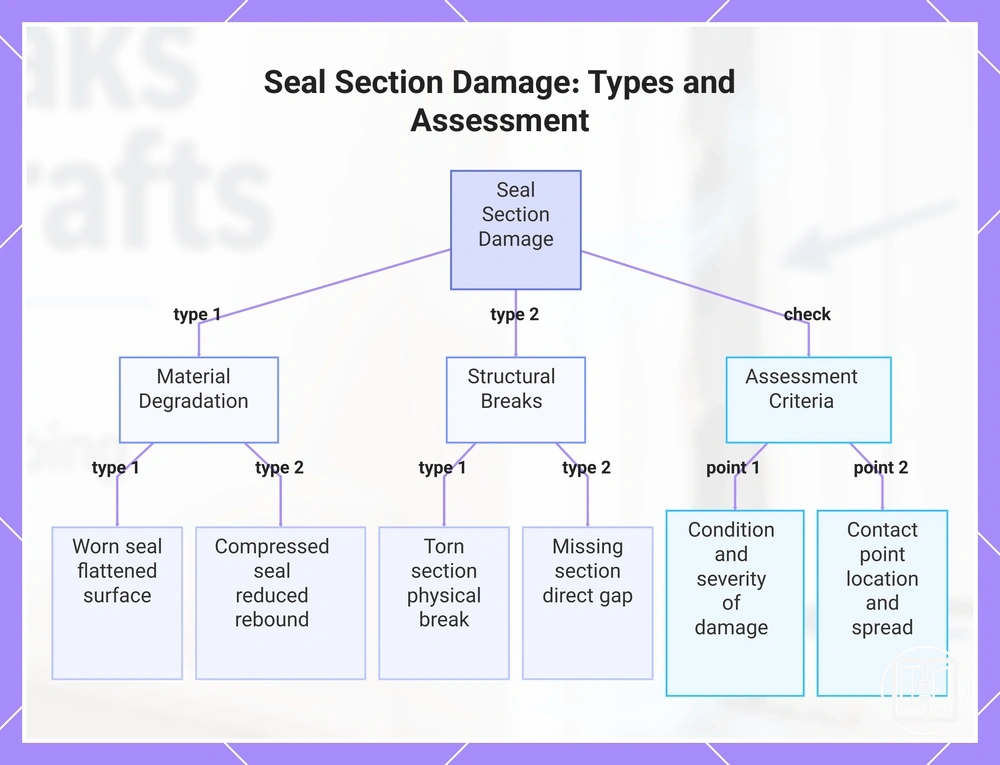
Worn, Compressed, Torn, or Missing Seal Sections
Worn seal, compressed seal, torn section, or missing section refers to physical damage in weather stripping where the material can no longer maintain consistent contact at the sealing line. When these conditions occur, the contact point between the seal and the door or window frame weakens, which can increase localized leak risk depending on the severity and position of the damage.
This damage typically appears in specific areas such as a jamb strip, sash seal, or along the bottom edge where repeated closing pressure or friction affects the material. A worn or compressed seal may flatten and reduce contact, while a torn or missing section creates a direct gap where sealing continuity is interrupted. In many cases, the impact depends on how much of the seal section is affected and whether the damage is concentrated at a primary contact point or spread across the edge. :contentReference[oaicite:0]{index=0}
Worn, compressed, torn, or missing seal sections should be checked by condition and contact point to understand how they affect sealing performance.
- Worn seal where material surface is flattened or degraded
- Compressed seal where excessive pressure reduces rebound and contact stability
- Torn section where physical breaks interrupt continuous sealing
- Missing section where gaps remove full contact along the edge
- Bottom edge wear where repeated friction increases local failure risk
This chart shows the main types of physical damage in weather stripping and the key criteria for assessing their impact on sealing performance.
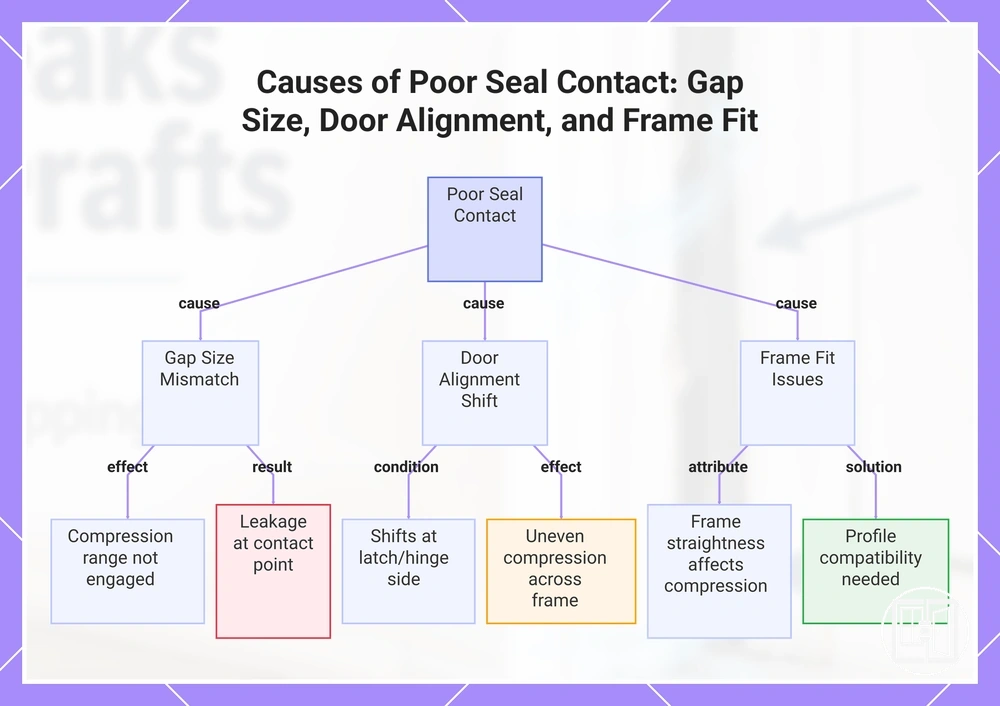
Poor Seal Contact From Gap Size, Door Alignment, or Frame Fit
Poor seal contact depends on gap size, door alignment, or frame fit even when a weather stripping strip is present. When the opening geometry does not match the seal profile, the compression range is not fully engaged at the contact point, which allows leakage to occur. This creates a gap-size-to-profile mismatch that leads to poor seal contact at the latch side or hinge side.
Poor seal contact is driven by how gap depth, gap width, and closing resistance interact with the seal profile and frame fit. If the door alignment shifts at the latch side or hinge side, the contact line may not compress evenly across the frame. Frame straightness also affects whether the strip reaches its intended compression range, especially under uneven closing pressure. These variables determine whether the seal can maintain consistent contact or only partial contact along the edge.
When the seal profile is too thick or too thin for the available opening, compression balance is disrupted and contact becomes inconsistent. In these cases, fit evaluation may relate to selection mistakes where seal profile does not match the required opening conditions. Persistent mismatch between gap size and frame fit may indicate that further adjustment alone is limited without addressing profile compatibility.
This chart shows the three main factors that cause poor weather stripping seal contact despite a seal being present.
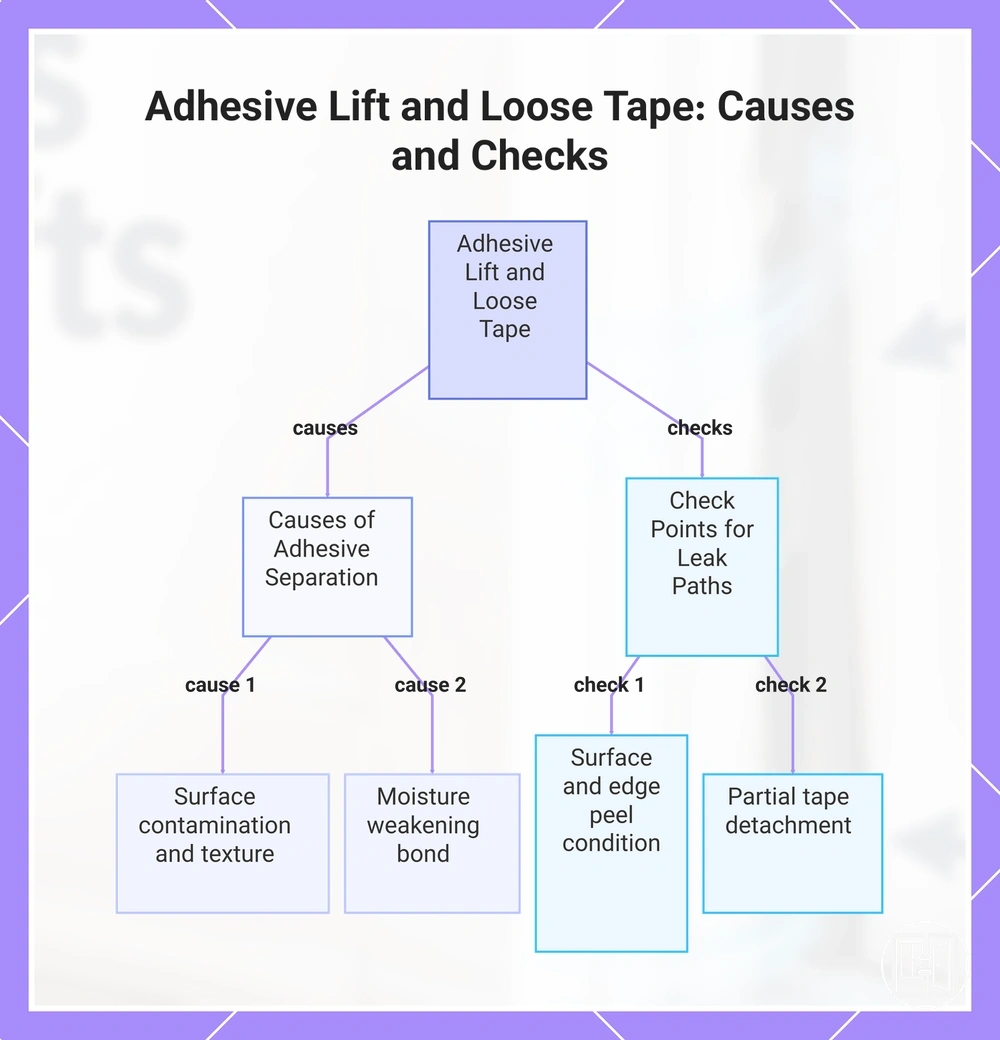
Adhesive Lift, Dirty Surfaces, and Loose Weather Stripping Tape
Adhesive lift, dirty surfaces, and loose tape create leak paths when an adhesive-backed weather stripping strip loses continuous contact with the frame. When edge peel or contact loss develops, even a small lifted section can allow air movement through the seal line despite the strip appearing installed. This produces a localized draft condition driven by adhesive separation at the edge rather than full strip failure.
Surface condition and edge stability determine how an adhesive-backed strip maintains contact, because performance depends on paint texture, dust presence, and moisture balance on the frame. Dirty surface layers, uneven paint texture, or trapped moisture can weaken bonding and increase the likelihood of adhesive lift or loose tape forming over time. In many cases, this leads to partial edge peel and gradual contact loss rather than immediate detachment, which may still create intermittent leak paths. :contentReference[oaicite:0]{index=0}
Adhesive lift, dirty surfaces, and loose weather stripping tape should be checked by surface, edge, and peel condition before assuming full adhesive failure.
- Surface condition where dust or residue reduces adhesive contact
- Edge peel where tape corners begin lifting from the frame
- Moisture exposure that weakens bonding over time
- Paint texture irregularities that reduce full adhesion contact
- Loose tape sections where partial detachment creates air leak paths
When adhesive lift or surface-related separation occurs, performance may vary depending on frame condition, and related cases can be reviewed alongside installation issues where adhesive application and contact stability are evaluated in context.
This chart shows the main causes of adhesive lift and the specific checks to identify leak paths from weather stripping tape.
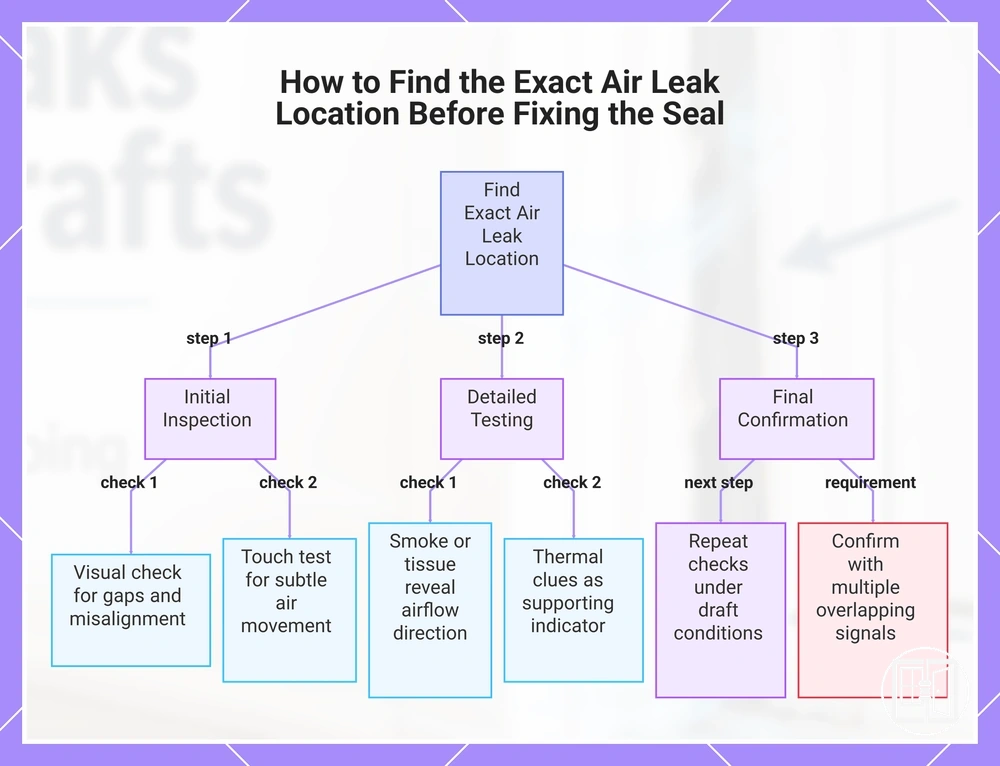
Finding the Exact Air Leak Location Before Fixing the Seal
Finding the exact air leak location determines where the repair should be applied, whether at the strip, frame, threshold, sash, or surrounding gap. When the leak location is unclear, adjustments or weather stripping changes may target the wrong area and fail to stop air movement. A correct diagnosis links the leak path directly to the fixing point across the frame system.
Leak location can be identified through visual inspection, touch test, smoke test, tissue movement, and thermal clues. Visual inspection helps identify misalignment or visible gaps along the threshold, sash, or frame, while touch testing helps confirm subtle air movement at suspected points. Smoke or tissue movement may reveal airflow direction, but results can vary depending on indoor air conditions, and safety caution is needed when using any heat or smoke source. Thermal clues can support interpretation but should not be treated as exact readings.
Finding the exact air leak location before fixing the seal should follow a structured sequence that prioritizes repeated confirmation under realistic draft conditions.
- Start with a visual inspection along the frame, sash, and threshold to identify obvious gaps or misalignment.
- Perform a touch test along edges to detect localized air movement at suspected leak paths.
- Observe tissue movement near closed doors or windows to trace airflow direction.
- Use thermal clues to identify cooler or warmer zones that may indicate leakage areas.
- Conduct a smoke test carefully in controlled conditions, using it only as a supporting check rather than a single confirmation method.
- Repeat the checks under normal draft-producing conditions to confirm consistent leak location before deciding on a weather stripping fix.
A leak location should be confirmed through multiple overlapping signals before selecting the repair point, since no single method provides a fully reliable result on its own.
This chart shows the structured process to locate air leaks accurately using multiple inspection methods and confirmation steps.
Frame, Sash, Jamb, Threshold, and Corner Checks
When a door or window has a suspected leak, the frame, sash, jamb, threshold, and corner areas should be checked by part and by contact condition. A visible gap can point to a weak contact point, but visibility alone may not confirm air movement. Visible gaps should be confirmed with an air-movement test before choosing the fix.
Frame, sash, jamb, threshold, and corner checks should verify both the part being inspected and the contact condition at that part. The goal is to separate gap visibility, loose contact, wear, and movement without turning the inspection into installation steps. This helps interpret findings more accurately before choosing a fix, and confirms results using an air-movement test.
- Frame: check for visible gap areas, uneven contact, or movement along the frame edge
- Sash: check whether the sash closes evenly against the weather stripping contact point
- Jamb: check for worn or loose contact where the door edge meets the jamb
- Threshold: check the bottom edge for gaps, wear, or weak contact under the door
- Corner: check where two seal lines meet, since small gaps can collect at corner points
- Latch side: check for uneven pressure where the door pulls into the frame
- Hinge side: check for movement or misalignment that changes contact along the edge
- Sill: check for visible gap areas or contact loss near the lower window frame
If the same inspection point shows both a visible gap and repeat air movement, the leak location is more likely to be connected to that part of the opening.
Hand, Smoke, and Thermal Draft Detection Tests
Hand test, smoke test, and thermal detector checks are used to confirm whether air is moving through a suspected seal area. Each method detects a different signal of the same leak location, helping verify draft presence around the frame, sash, jamb, threshold, or corner zones. Results may vary depending on nearby vent flow, fan activity, or outdoor wind conditions that influence air movement at the opening.
These methods do not provide identical readings, so interpretation depends on comparing signals rather than relying on one outcome. A hand test may feel subtle airflow changes, smoke or incense movement may show directional draft flow, and tissue movement can help visualize light air disturbance. Thermal detector readings can support temperature differences but should be interpreted cautiously because vents, fans, or wind can distort local air patterns.
To check for air movement through a suspected leak location, follow a structured sequence of simple draft detection checks:
- Perform a hand test along the frame, sash, and threshold to feel for localized moving air.
- Use smoke test or incense carefully to observe directional airflow near the suspected seal area.
- Hold tissue near edges to detect subtle tissue movement caused by air leakage.
- Use a thermal detector to observe temperature variation around the jamb, corner, and contact points.
Caution: Nearby vents, fans, and outdoor wind can affect results, so each test should be repeated under stable indoor conditions for more consistent interpretation.
Weather Stripping Leaks vs Frame Gaps That Need Other Sealing
A weather stripping leak refers to air passing through movable seal contact, while a fixed frame gap refers to openings in the structural perimeter that typically require other sealing methods. The distinction depends on whether air moves through a flexible contact point or a non-movable opening in the frame assembly. This difference separates issues that involve the seal itself from those involving the surrounding structure.
Weather stripping leaks are identified when air movement occurs at movable seal contact points such as the frame edge, sash, jamb, or threshold where compression is expected. These cases often depend on seal condition, alignment, and contact pressure along the closing line. In many cases, the issue is linked to wear, uneven pressure, or partial contact loss rather than structural openings.
Fixed frame gaps include conditions such as perimeter gaps, caulk failure along the window or door edge, threshold voids, or areas where foam or backer rod is used to fill larger structural spaces. These gaps are not dependent on compression from a moving sash or door and usually indicate separation between building materials rather than seal wear. They require different sealing logic compared to weather stripping contact issues.
Weather stripping leaks vs frame gaps that need other sealing depends on whether airtightness expectations vary by seal type and gap condition. In some cases, tighter sealing outcomes may relate to material choice and application context rather than a single repair approach. performance comparison
| Leak type | Where air passes | What to check | Likely next action |
|---|---|---|---|
| Weather stripping leak | Movable seal contact at door or window edge | Compression, alignment, wear, contact continuity | Seal adjustment or replacement of strip |
| Fixed frame gap | Structural perimeter openings | Caulk condition, perimeter separation, void depth | Other sealing methods such as fill or reseal |
:contentReference[oaicite:0]{index=0}
Matching the Air Leak Cause to the Right Weather Stripping Fix
The correct weather stripping fix depends on correctly identifying the symptom, cause, and gap condition before choosing any repair approach. A weather stripping leak is matched to a fix type based on where air enters, how the seal behaves, and whether the issue is contact-related or gap-related. In most cases, cause and gap condition control whether the solution involves temporary repair, adjustment, or replacement rather than a single universal approach.
The decision depends on key variables such as gap size, seal condition, seal profile, and location of the leak along the frame. Small contact issues may respond to seal tape, foam strip, or draft stopper as temporary repair options, while unstable airflow or recurring drafts often indicate a fit correction or replacement need. A clear stop point occurs when temporary materials no longer maintain consistent contact or when the seal profile no longer matches the frame behavior.
Matching the air leak cause to the right weather stripping fix requires organizing symptom, cause, fix type, fit condition, and limitation into a structured decision view.
| Symptom | Likely cause | Fix type | Fit condition | Limitation |
|---|---|---|---|---|
| Light edge draft | Minor seal wear or compression loss | Seal tape or adjustment | Low gap size, stable alignment | Temporary improvement, may return under movement |
| Bottom airflow | Uneven threshold contact | Foam strip or draft stopper | Moderate gap, partial closure contact | Limited durability under repeated use |
| Side draft persistence | Seal profile mismatch | Profile correction or replacement | Consistent misfit along jamb or frame | Temporary fixes may not stabilize airflow |
| Wide perimeter leakage | Fixed gap or structural separation | Other sealing adjustment (non-stripping) | Large gap beyond compression range | Weather stripping alone may be insufficient |
In each case, the fix type must match the symptom severity and gap condition to avoid repeated temporary repairs that do not resolve the underlying cause.
When Seal Tape, Foam Strip, or Door Draft Stopper Repair Is Enough
Seal tape, foam strip, or a draft stopper is enough when the leak is a small gap, localized leak, and closing pressure still allows the seal area to maintain basic contact. These light repairs work when the issue is limited to surface-level separation at the door bottom or minor edge wear rather than structural misfit. In these conditions, temporary repair can reduce airflow, but suitability always depends on gap size and seal condition.
When Seal Tape, Foam Strip, or Door Draft Stopper Repair Is Enough depends on gap size, location, surface condition, and expected durability under normal closing pressure. If the seal profile still aligns and movement does not reopen the gap, a light repair may remain effective for localized issues only.
When Seal Tape, Foam Strip, or Door Draft Stopper Repair Is Enough depends on gap size, location, surface condition, and expected durability under normal closing pressure. If the seal profile still aligns and movement does not reopen the gap, a light repair may remain effective for localized issues only.
- Small gap: minor openings where seal tape can sit flush without creating misalignment
- Localized leak: airflow concentrated at a single point rather than across the full frame
- Foam strip suitability: works when surface condition allows stable compression contact
- Draft stopper use: mainly effective for door bottom airflow where the symptom is floor-level draft
- Closing pressure: must still allow the door to close without excessive resistance
- Limitation cue: if gaps widen or repeat after use, temporary repair may not remain stable
In cases where the leak exceeds a small gap or seal condition continues to shift, temporary repair with seal tape, foam strip, or a draft stopper may not be sufficient over time. :contentReference[oaicite:0]{index=0}
When the Gap Needs a Different Seal Profile or Better Fit
Different seal profile or better fit depends on gap size, compression range, and frame type. When a weather stripping leak continues after adjustment, it often signals a fit mismatch rather than insufficient material. In these cases, frame contact, latch resistance, or alignment can prevent proper compression along the edge, leading to a compression range or fit mismatch.
Profile compatibility is shaped by how the seal interacts with frame type, closing behavior, and pressure distribution during contact. A thicker or thinner profile may be required when latch resistance affects closure force or when misalignment reduces even frame contact along the sealing edge. These variables determine whether correction is needed at the profile level instead of adding another layer of material, while detailed profile selection remains part of broader selection logic.
When the gap needs a different seal profile or better fit depends on profile fit, compression range, and closing behavior. The criteria below helps separate fit mismatch from cases where layering material may not resolve the leak.
- Gap size: inconsistent compression indicates potential profile mismatch rather than surface-level wear
- Compression range: seal must compress evenly without excessive force or loose contact
- Frame type: rigid or flexible frames influence how the seal engages the contact surface
- Latch resistance: higher resistance may indicate the need for a thinner profile for proper closure
- Alignment: uneven closure reduces continuous frame contact and creates localized leak points
- Frame contact: incomplete contact suggests profile adjustment rather than additional layering
Draft Proofing Mistakes That Keep Air Leaks Open
Draft proofing mistakes occur when a repair attempt targets the wrong gap, material condition, or installation surface, so the air leak remains open after sealing work. This often happens when the applied action does not match the actual failure mechanism, and the corrective signal is not properly reflected in the repair outcome. The result is a continuing draft even after visible sealing effort.
Draft proofing mistakes can be grouped by action type, failure mechanism, and corrective signal to clarify why leaks persist. Typical issues include sealing a wrong gap instead of the actual airflow path, ignoring door alignment that affects frame contact, or applying material on a dirty surface that reduces adhesion stability. Other cases include wrong thickness affecting compression range, missed corners breaking continuity, sealing only one side, or blocked operation that interferes with normal closing behavior. The corrective signal is consistent when air movement continues at the same contact point after the repair attempt.
Draft proofing mistakes that keep air leaks open should be organized by action, failure mechanism, and corrective signal to separate application errors from structural or alignment-related issues.
| Mistake | Why it keeps leaking | Diagnostic clue | Better correction |
|---|---|---|---|
| Sealing wrong gap | Material applied away from actual airflow path | Leak remains at same contact point | Relocate sealing based on airflow detection |
| Ignoring door alignment | Uneven frame contact affects compression | Uneven sealing pressure along latch or hinge side | Adjust alignment before resealing |
| Dirty surface application | Weak adhesion causes early lift or separation | Edge peel or partial detachment appears | Clean surface before reapplication |
| Wrong thickness | Compression range does not match frame contact | Seal either over-compresses or fails to touch | Select fit based on gap size and closing pressure |
| Missed corners | Seal continuity breaks at junction points | Localized airflow at corner intersections | Extend sealing through corner transitions |
| Blocked operation | Door cannot close in normal alignment state | Increased resistance or rebound during closing | Reposition seal to maintain normal operation |
Each mistake can be identified through a corrective signal such as persistent airflow, uneven frame contact, or disrupted closing behavior, indicating that the repair action may need adjustment rather than repetition.
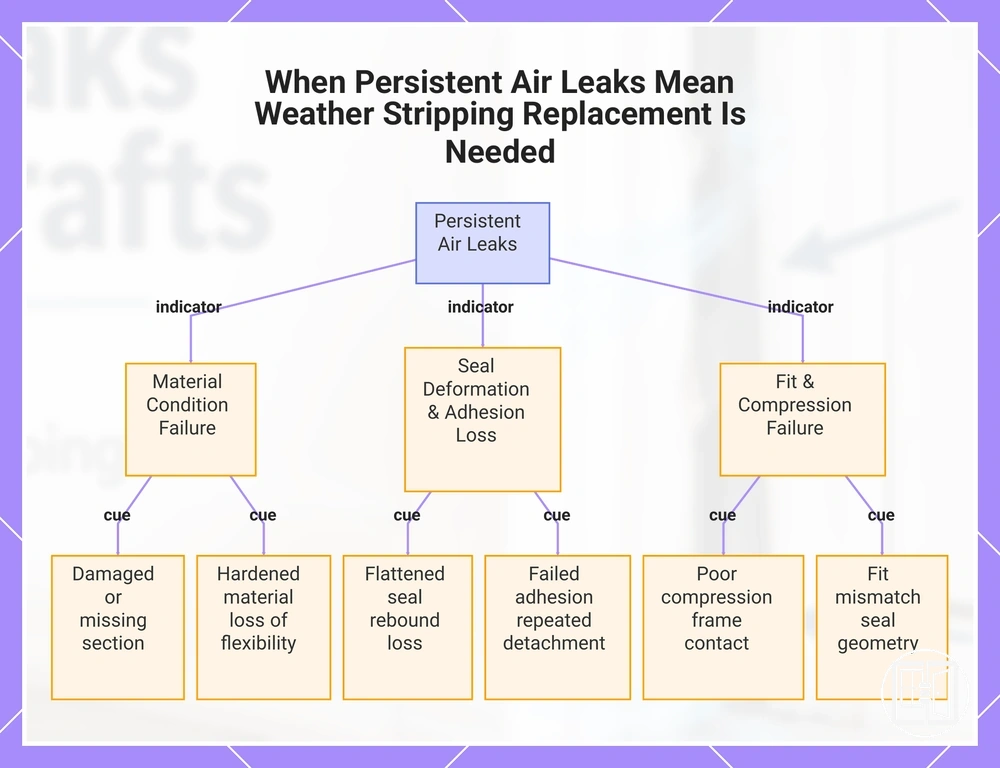
When Persistent Air Leaks Mean Weather Stripping Should Be Replaced
A persistent air leak often indicates that weather stripping replacement may be required when repeated sealing attempts no longer stop airflow. When damaged section, hardened material, flattened seal, failed adhesion, poor compression, or fit mismatch continue after correction, the seal may no longer operate within its effective compression range. In such cases, replacement remains conditional rather than automatic, depending on the overall frame and seal behavior.
Persistent air movement after correct testing usually points to a limit in the current sealing condition. A damaged section or hardened material can reduce flexibility, while a flattened seal may lose contact rebound under closing pressure. Failed adhesion or poor compression can also prevent stable frame contact, and in some cases frame adjustment or alignment correction may still be required before deciding on replacement. This creates a boundary where repair effectiveness depends on both material condition and fit behavior.
When persistent air leaks mean weather stripping should be replaced depends on symptoms, material condition, repeated failure, and fit mismatch. The following checklist helps identify replacement cues:
- Recurring air movement after correct testing and repeated repair attempts
- Damaged section where parts of the seal are missing or broken
- Hardened material that no longer compresses under normal closing pressure
- Flattened seal showing loss of original shape and rebound ability
- Failed adhesion where the strip repeatedly detaches from the surface
- Poor compression where consistent frame contact cannot be maintained
- Fit mismatch where seal geometry no longer matches frame movement
In some cases, persistent leaks may also require frame alignment correction, compatible seal selection, or adjusted airtightness expectations depending on installation conditions and structural behavior.
This chart shows the key replacement cues for weather stripping when persistent air leaks continue despite repair attempts.