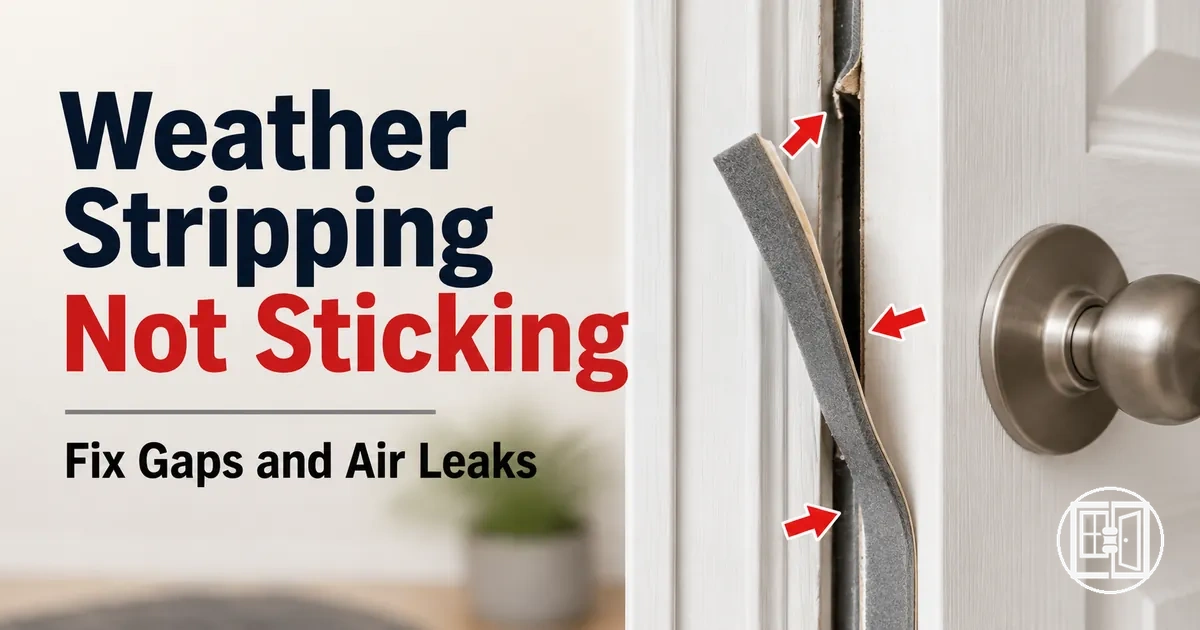
Weather stripping not sticking and adhesive seal failure
When weather stripping will not stay attached, the seal strip is often losing contact with the window frame or door frame. The problem usually starts at the frame surface, adhesive backing, or seal edge. This is adhesive bond failure.
Adhesive failure can show up as peeling, a loose seal, lifting corners, weak grip, or a strip that slides after pressure is applied. The repair path depends on surface preparation, cleaning, drying, residue, strip condition, pressure, temperature, moisture, and curing conditions. Identify the symptoms before causes.
A self-adhesive seal may loosen on a painted, dusty, damp, or uneven frame even when the strip itself still looks usable. A foam strip or door seal tape may also fail when the backing is contaminated, compressed, or unable to keep steady contact. Adhesive failure can create an air gap or draft, but not every draft is caused by adhesion, and not every gap is a poor fit issue.
Repair may be possible when the seal strip is intact and the frame can support a clean bond. If the backing is failed, the surface is unstable, or the strip no longer holds shape, replacement may be the safer repair expectation.
What adhesive failure means for weather stripping seals
Adhesive failure is the loss of the adhesive bond between a weather stripping seal and the window frame or door frame. The weather stripping seal no longer maintains reliable contact with the frame surface, resulting in weak grip, partial detachment, or complete detachment. This loss of contact can reduce sealing reliability.
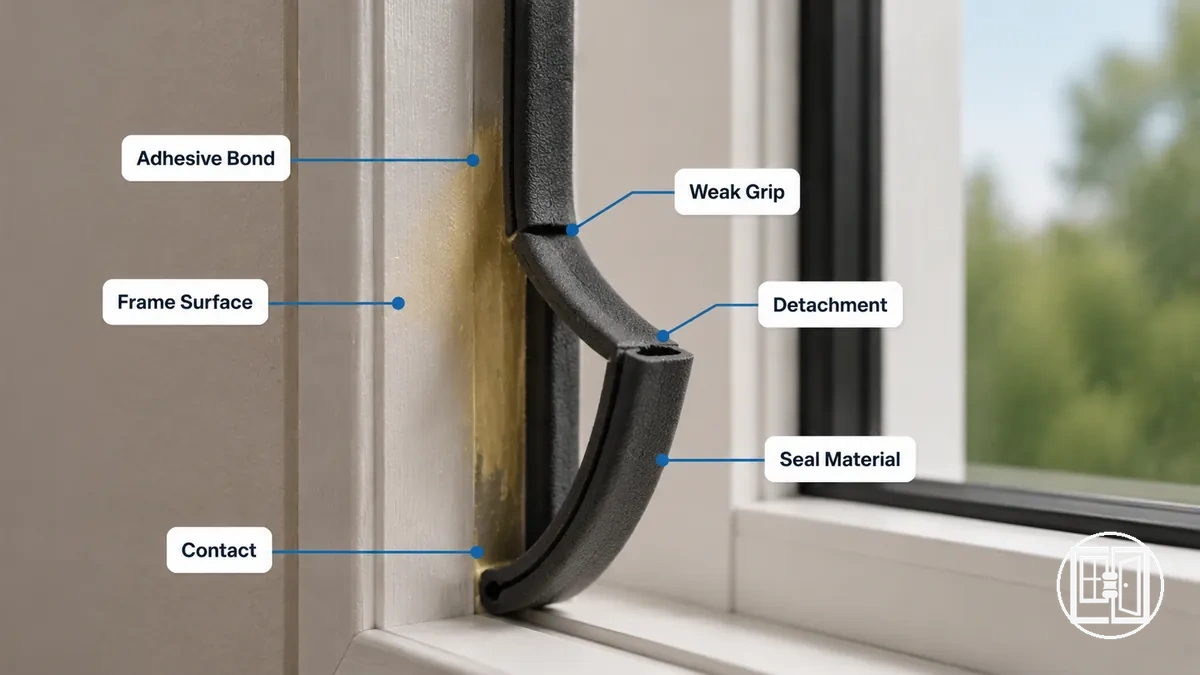
Adhesive failure means the bond between the weather stripping seal and the frame has failed, not necessarily that the seal material itself has failed. The annotated image identifies the adhesive backing area, the frame contact point, and the lifted section where adhesive failure means the bond has been lost. A failed adhesive backing or loose adhesive strip may still leave the seal material usable, depending on its condition.
| Adhesive bond failure | Seal material damage |
|---|---|
| The weather stripping seal loses contact with the frame surface because the adhesive bond has weakened or detached. | The seal material is worn, torn, compressed, or otherwise no longer seals effectively. |
| The seal material may still be usable if a reliable bond can be restored. | Material damage may require replacement even when the adhesive backing remains attached. |
Symptoms of failing adhesive weather stripping
Symptoms of failing adhesive weather stripping are usually visible before the adhesive bond fails completely. A loose strip, peeling edge, lifting, sliding, gaps, adhesive residue, or reduced frame contact are common visible signs. These symptoms help identify bond condition, but they do not prove every cause because similar signs can also appear with poor fit or other air leak issues.
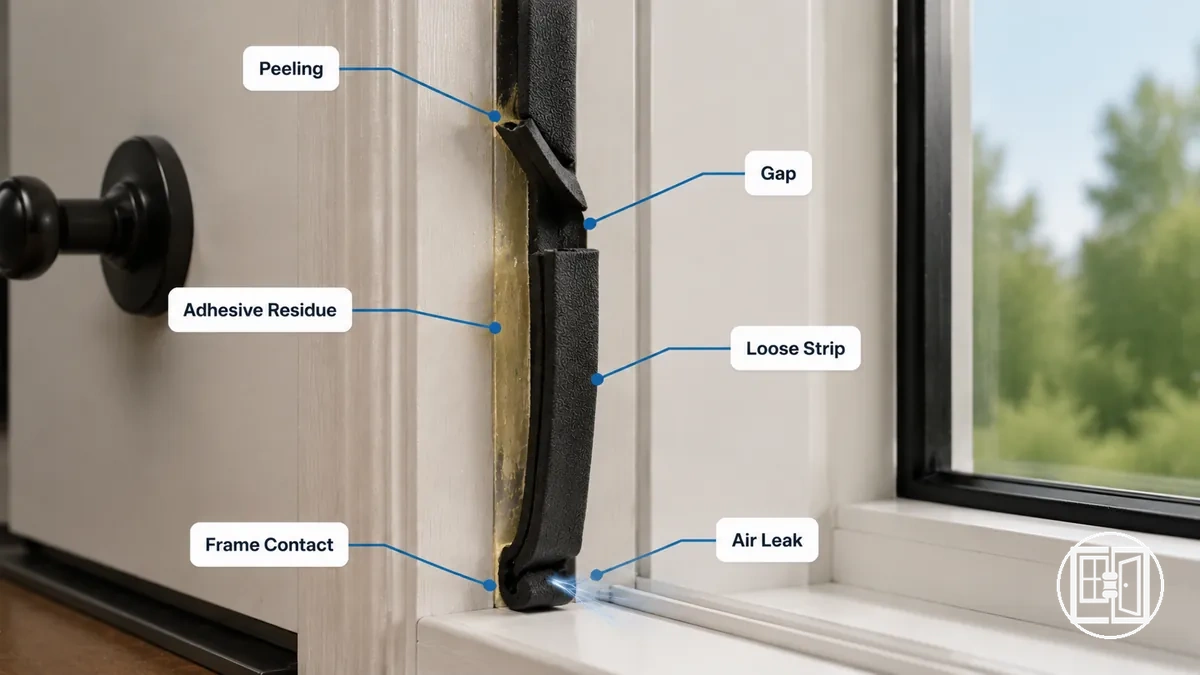
On a door, repeated movement may make a loose foam strip or detached edge easier to notice as the seal shifts during opening and closing. On a window, lifting along the frame or visible gaps may become more obvious when the sash moves or closes. Symptoms of failing adhesive weather stripping are organized below by bond condition so visible signs can be assessed before moving on to possible causes.
- Peeling edge: The seal strip lifts from the frame surface, which may indicate a weakening adhesive bond and reduced frame contact.
- Sliding strip: The weather stripping moves out of position during door or window movement, suggesting a weak bond or failed adhesive backing.
- Visible gaps: A gap forms between the seal strip and the frame, increasing the risk of an air leak if contact is incomplete.
- Loose foam strip: Part of the strip hangs away while the remaining section stays attached, indicating partial detachment.
- Adhesive residue: Residue remains on the frame after separation, which may point to adhesive strip failure.
- Reduced frame contact: The seal no longer sits evenly against the frame, which can reduce sealing reliability.
These visible symptoms can support a repair decision, but they should be separated from the underlying cause. Air movement can overlap with adhesive failure, yet it may also result from other conditions, so review air leak symptoms when a broader draft diagnosis is needed.
Peeling, lifting, sliding, and loose strip edges
Peeling, lifting, sliding, and loose strip edges are visible signs that the adhesive backing has lost reliable frame contact. The strip edge moves away from its original position, although the reason for the movement may vary. Edge movement is the key local sign to observe.
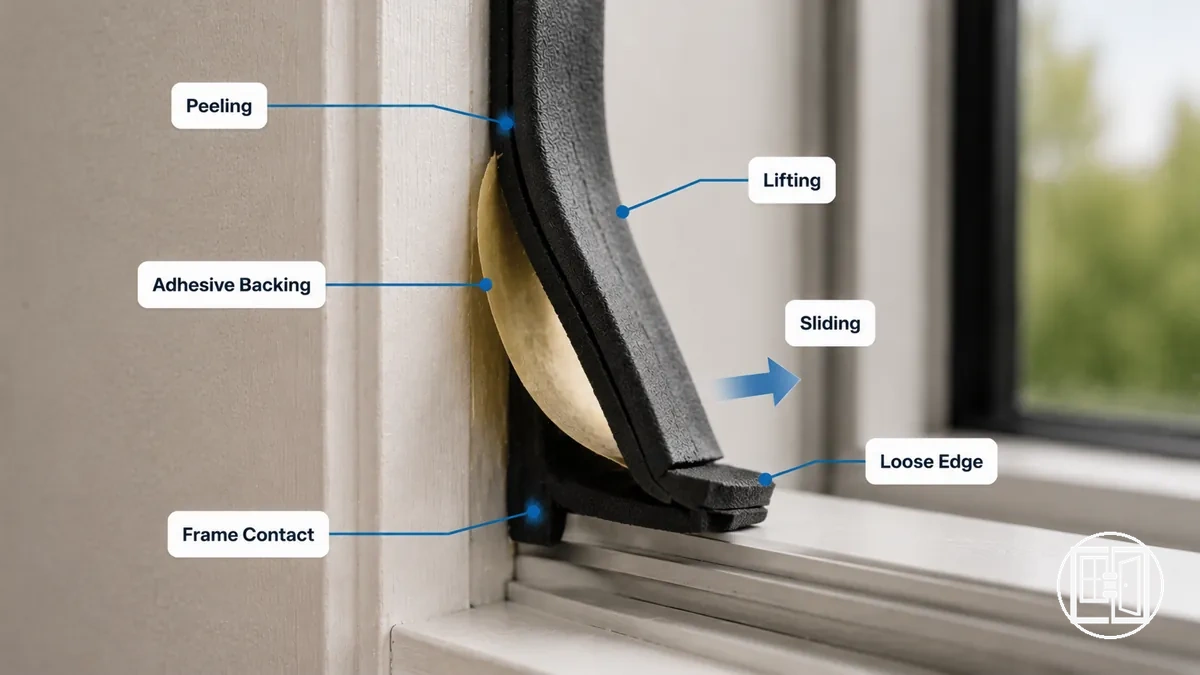
Peeling, lifting, sliding, and loose strip edges are grouped below by movement pattern so each visible symptom can be linked to the local adhesive bond condition. The checklist focuses on observation rather than repair.
- Peeling: The strip edge separates from the frame surface, which may indicate a weak edge bond and reduced frame contact.
- Lifting: A raised edge or detached corner shows the adhesive backing is no longer maintaining even contact with the frame.
- Sliding: The moving strip shifts along the frame, suggesting reduced adhesive contact in the direction of movement.
- Loose edge: One section remains attached while another edge lifts, indicating localized loss of adhesive backing contact.
Seal gaps caused by adhesive loss rather than poor fit
When seal gaps appear, the difference between adhesive loss and poor fit depends on how the strip contacts the frame. A gap with loose adhesive grip may look similar to a misfit seal, so the visible condition should be assessed before drawing a conclusion. A changing gap line caused by reduced adhesive grip is the main cue to observe.
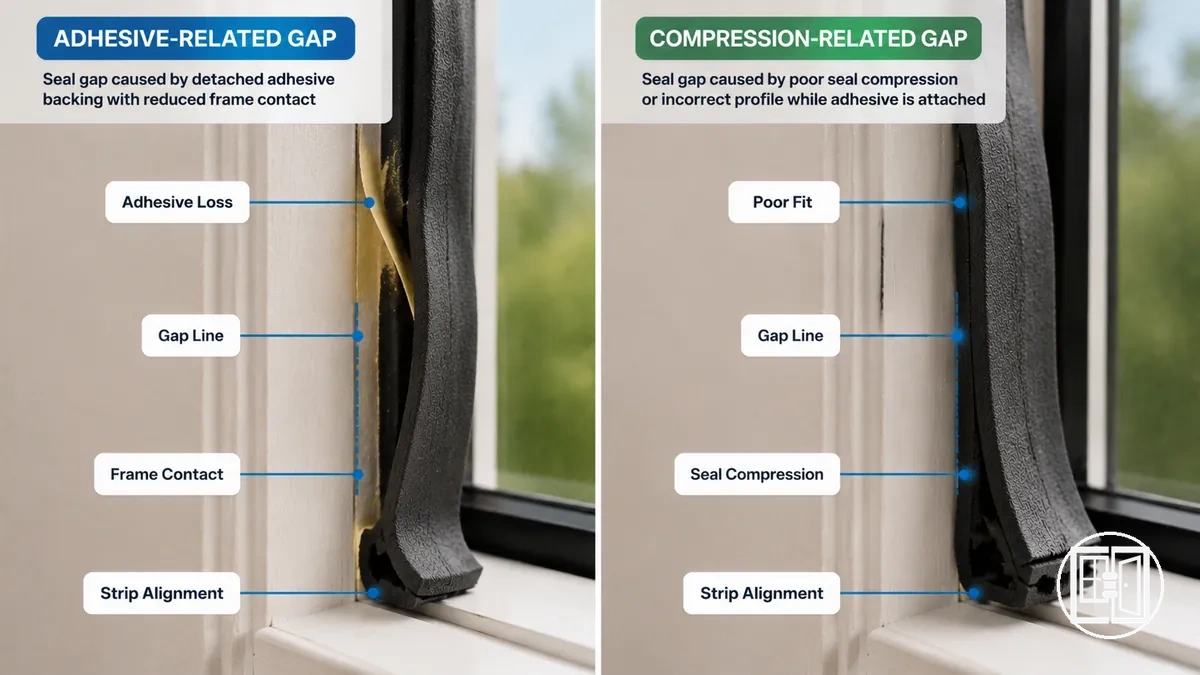
Seal gaps caused by adhesive loss rather than poor fit can look alike because both reduce frame contact. A loose bond may allow part of the strip to separate while the seal profile still appears correct, whereas a wrong profile may stay attached but show limited seal compression or strip alignment. The comparison below is intended only for local diagnosis because gaps can have mixed causes.
| Gap clue | What it may mean |
|---|---|
| Gap line with loose adhesive grip or detached backing | May indicate adhesive loss reducing frame contact. |
| Strip remains attached but seal compression is uneven or the profile appears mismatched | May indicate poor fit or a wrong profile rather than adhesive loss. |
| Visible gap with both reduced adhesive grip and uneven strip alignment | May involve mixed conditions that require further inspection before deciding the cause. |
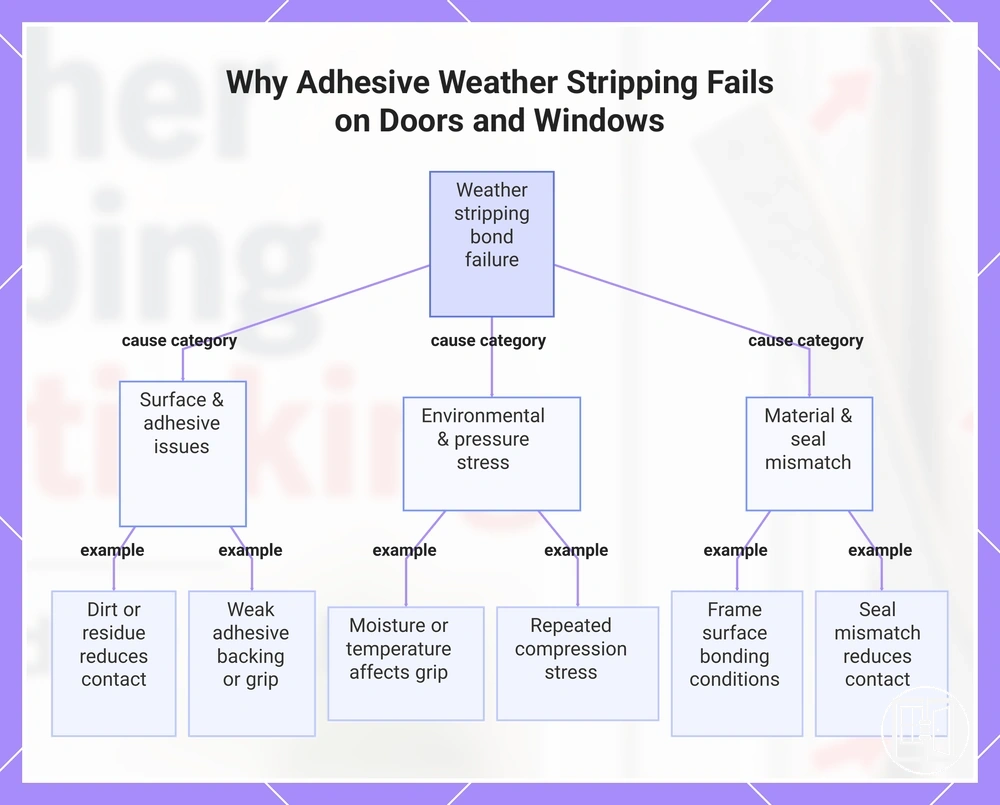
Why adhesive weather stripping fails on doors and windows
Adhesive weather stripping fails on doors and windows when the adhesive bond can no longer maintain reliable contact with the frame. The cause is often related to surface condition, environmental exposure, pressure load, or seal mismatch rather than a single factor. These cause categories can also overlap.
A weak bond may begin with residue, contamination, or poor surface condition that reduces adhesive backing contact. Moisture and temperature can affect adhesive grip, while repeated pressure load from door movement or seal compression may increase stress on the bond. Frame material and seal mismatch can also reduce consistent contact. More than one condition may contribute to the same bond failure.
For example, a loose seal may result from both a dirty surface and high compression instead of either condition alone. Identifying the main cause category helps guide later preparation and repair decisions without assuming one universal reason. The checklist below groups the most common cause categories.
Why adhesive weather stripping fails on doors and windows can often be grouped into surface, environment, pressure, and material conditions.
- Surface condition: Dirt, residue, or contamination may reduce adhesive backing contact and weaken the bond.
- Adhesive backing: Reduced adhesive grip or failed backing can allow the seal to loosen or peel from the frame.
- Moisture and temperature: Environmental conditions may affect adhesive curing or long-term grip, depending on exposure.
- Pressure load: Repeated door movement or seal compression can increase stress on the adhesive bond over time.
- Frame material: Different frame surfaces may provide different bonding conditions, depending on their finish and condition.
- Seal mismatch: A seal that does not match the required profile or compression may reduce frame contact and contribute to bond failure.
This chart shows the main cause categories that lead to adhesive weather stripping bond failure on doors and windows, including surface, environmental, pressure, and material factors.
Dirty surfaces, old residue, oil, dust, and paint contact
Dirty surfaces, old residue, oil, dust, and paint contact can prevent adhesive backing from bonding evenly to the frame. Surface contamination reduces direct contact between the adhesive backing and the frame, creating a possible bond barrier. Recognizing contamination helps identify a local cause of weak adhesion without assuming every bond failure has the same source.
- Old residue: Residue film on the frame can reduce adhesive backing contact and contribute to weaker adhesion.
- Dust: Dust can create a surface barrier that limits even contact between the adhesive backing and the frame.
- Oil or grease: Oil or grease may reduce adhesive grip by preventing consistent contact across the bonding surface.
- Cleaning-product film: Remaining cleaning-product film may interfere with adhesive contact, depending on the product and surface condition.
- Loose paint: Adhesive backing may bond to unstable paint instead of the frame, increasing the chance of bond failure if the paint separates.
- Paint contact: Painted frame texture may reduce full adhesive contact, depending on the finish and local surface condition.
Moisture, temperature, pressure, and curing conditions
Moisture, temperature, pressure, and curing conditions can affect adhesive bond strength during and after application. Damp surfaces, humidity, temperature changes, compression pressure, and door movement may reduce adhesive grip or contribute to peeling, while curing depends on the adhesive instructions. The table below groups these conditions by their effect on adhesive setting and hold because bond strength is condition dependent.
| Condition | Adhesion effect | Safe writing cue |
|---|---|---|
| Moisture or humidity | May reduce adhesive contact or contribute to weak grip on a damp surface. | Bond performance depends on surface dryness and adhesive instructions. |
| Temperature | Cold frames or heat exposure may affect curing and adhesive bond strength. | Avoid universal temperature limits; follow manufacturer guidance when available. |
| Compression pressure | High compression can increase stress on the adhesive bond and may contribute to peeling. | Pressure effects vary with seal fit and installation conditions. |
| Door movement | Repeated movement may disturb the adhesive bond before curing is complete. | Movement effects depend on curing conditions and adhesive instructions. |
| Cure time | Insufficient curing may reduce adhesive bond strength or long-term hold. | Use the cure time specified by the adhesive manufacturer rather than a universal value. |
Wrong strip thickness, compression, or adhesive backing
Wrong strip thickness, compression, or adhesive backing can increase adhesion failure risk even when the frame is clean. Compatibility depends on how the seal profile, adhesive backing, frame material, contact pressure, and movement load work together. The checklist below connects fit conditions to bond strength because poor compatibility can place additional stress on the adhesive bond.
A strip that is too thick may create higher compression, while an adhesive backing type that is not well suited to the frame material may reduce consistent contact. Contact pressure and repeated movement can further increase stress on the adhesive bond. These conditions should be considered together because failure risk depends on the overall compatibility rather than a single attribute.
- Strip thickness: A strip that is too thick for the gap may increase compression force and raise failure risk by placing additional stress on the adhesive backing.
- Compression: Excessive compression pressure may reduce bond stability when the seal remains under continuous load.
- Adhesive backing: Backing type should suit the frame material and application because unsuitable adhesion may increase peeling or weak bond risk.
- Frame material: Different frame materials may provide different bonding conditions, influencing contact pressure and adhesive bond strength.
- Seal profile: A seal profile that does not match the gap or movement load may reduce even contact and increase adhesion failure risk.
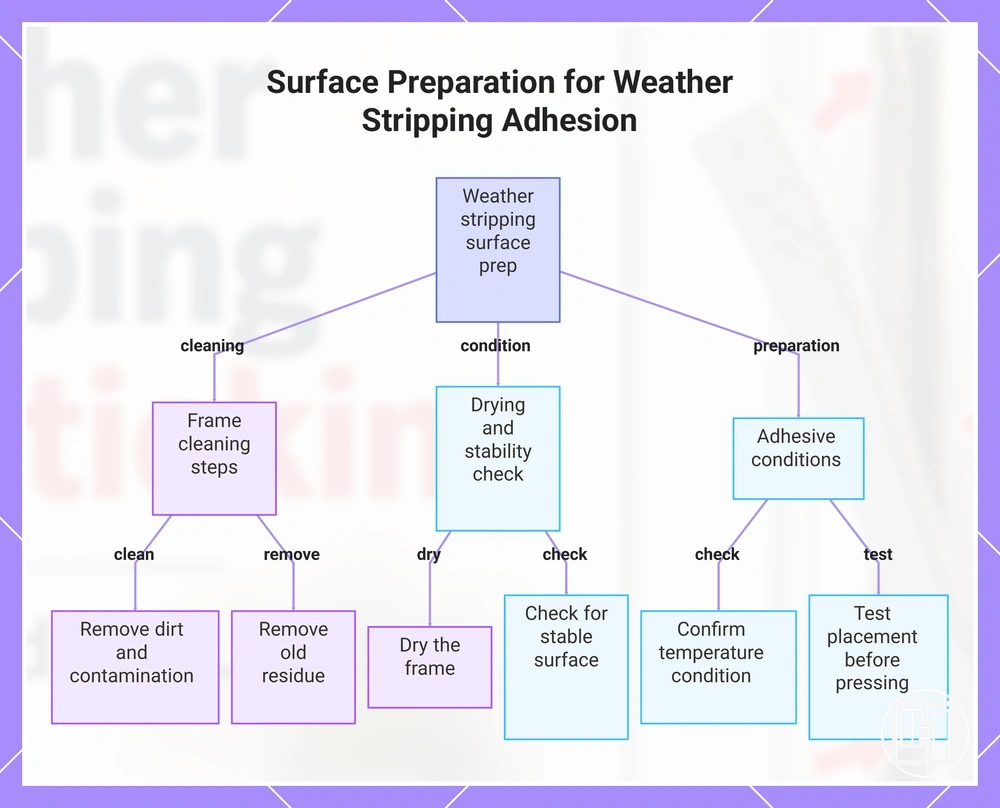
Surface preparation for weather stripping adhesion
Surface preparation for weather stripping adhesion starts with creating a clean, dry, and stable frame surface before applying adhesive weather stripping. Proper preparation helps improve adhesive contact and reduces avoidable bond problems. Surface preparation is the main control point before repair.
Residue, moisture, or an unstable frame surface can reduce adhesive contact even when the seal strip is correctly aligned. Frame cleaning, drying, and residue removal should be completed before applying the adhesive backing, while temperature condition should follow the adhesive instructions where available. Preparation methods should match the frame material because different surfaces may require different care. Preparation should always remain material-specific rather than relying on one approach for every frame.
If adhesive failure has already occurred, test placement before pressing the backing into position can help confirm strip alignment and contact pressure. This preparation stage can identify positioning issues before the adhesive is fully engaged. For broader installation guidance, see installation prep mistakes.
- Clean the frame surface: Remove loose dirt and visible contamination so the bonding surface allows better adhesive contact.
- Remove old residue: Clear remaining adhesive or residue where appropriate for the frame material because leftover film may weaken the bond.
- Dry the frame: Ensure the bonding surface is dry before application because moisture may reduce weather stripping adhesion.
- Check for a stable surface: Inspect for loose paint or unstable finishes because the adhesive backing should contact a stable surface rather than a layer that may separate.
- Confirm the temperature condition: Apply the weather stripping under conditions recommended in the adhesive instructions because temperature may influence bonding performance.
- Test placement: Position the strip first to confirm alignment and contact pressure before pressing the adhesive backing firmly into place.
This chart shows the key preparation steps and checks required to ensure proper weather stripping adhesion.
Cleaning and drying the frame before bonding
Cleaning and drying the frame before bonding creates a clean bonding surface for reliable adhesive contact. Dust, grease, moisture, and cleaning residue can reduce contact between the adhesive backing and the frame surface. The local goal is a clean, dry frame before bonding.
- Clean the frame surface: Remove dust and grease using a cleaning method that is suitable for the frame material, then check that the bonding surface appears clean.
- Check for cleaning residue: Make sure the cleaning process does not leave a surface film because cleaning residue may reduce adhesive contact.
- Allow adequate drying: Let moisture evaporate before applying the weather stripping, as drying time may vary with the cleaner and surrounding conditions.
- Confirm surface readiness: Check that the frame surface is clean, dry, and free from visible moisture before pressing the adhesive backing into place.
Removing old adhesive before applying a new seal
Removing old adhesive before applying a new seal helps the new seal sit flat and make even adhesive contact. Raised residue, sticky film, or remaining tackiness can create uneven contact with the frame surface. Old adhesive residue should be treated as a physical barrier before bonding.
If adhesive residue is thin and the frame finish remains stable, a suitable removal method may restore a more even bonding surface. When the frame finish appears delicate or begins to lift, the removal method should be adjusted because surface damage risk depends on the material and finish.
- Check residue thickness: Look for raised residue that could prevent the new seal from sitting flat against the frame.
- Assess tackiness: Identify sticky film or leftover backing that may interfere with even adhesive contact.
- Consider the frame finish: Choose a removal method that is appropriate for the frame finish because different surfaces may respond differently.
- Watch for surface damage risk: Stop and reassess if the frame finish begins to lift or shows signs of damage during residue removal.
- Confirm surface contact: Before fitting the new seal, check that remaining residue is not creating gaps or uneven contact.
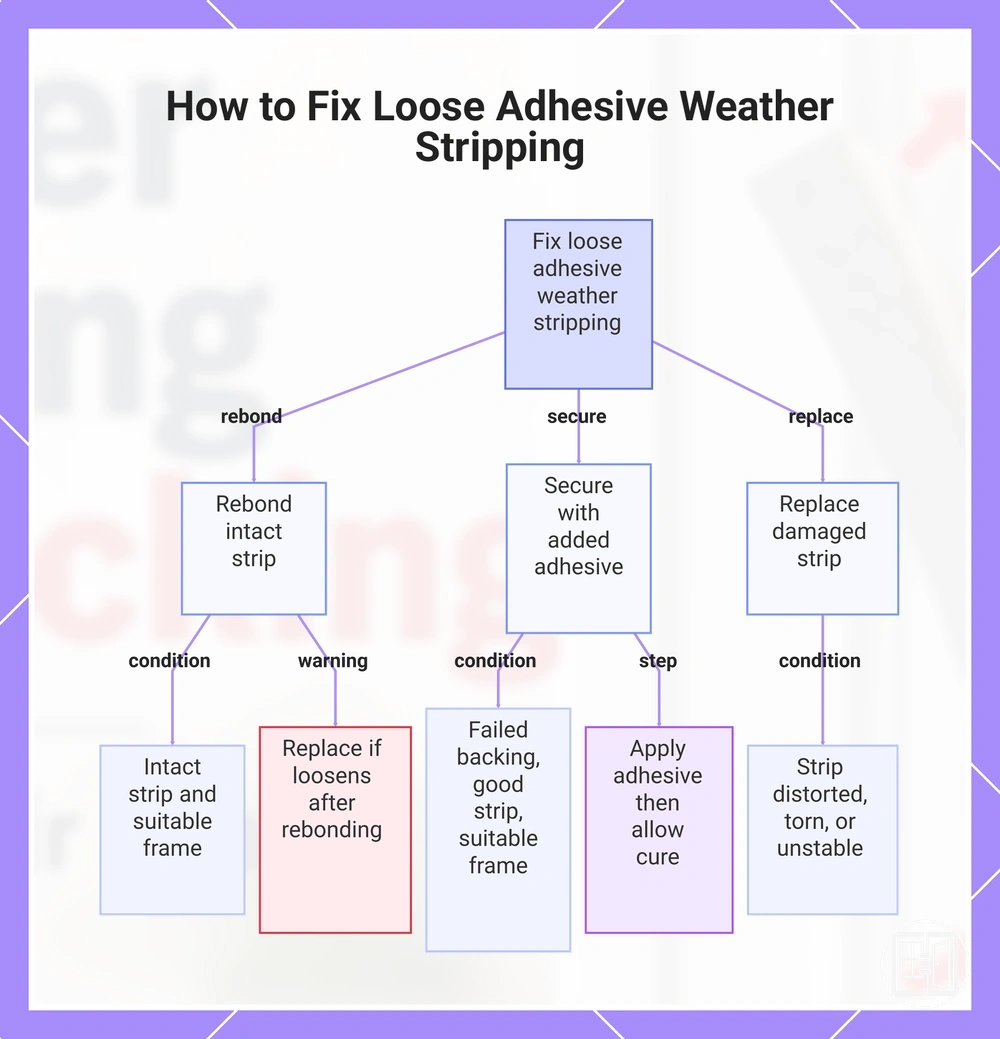
How to fix loose adhesive weather stripping
How to fix loose adhesive weather stripping depends on the condition of the strip, the adhesive backing, and the frame. A usable strip may be rebonded or secured, while a failed backing or damaged strip may require replacement. The repair path is usually to rebond, secure, or replace based on these conditions.
If the loose adhesive weather stripping remains intact and the frame condition is suitable for bonding, rebonding may be a practical repair path. When the adhesive backing has failed but the usable strip remains in good condition, reattaching it with added adhesive may be reasonable if even pressure and suitable cure conditions can be maintained. If the strip is distorted, torn, or no longer provides stable contact, replacement may be the more suitable option. The correct repair path depends on the strip, adhesive, and frame condition.
If the weather stripping continues to loosen after careful rebonding, reassess the strip condition rather than repeatedly adding adhesive. A failed backing or deteriorated strip may limit the repair outcome even when the frame condition is suitable for bonding. Replacement may become the safer repair choice when rebonding no longer provides reliable contact.
- Inspect the strip: Check whether the loose adhesive weather stripping is a usable strip or has a failed backing, then choose the appropriate repair path.
- Assess the frame condition: Confirm that the bonding surface is suitable before attempting to rebond or secure the strip.
- Choose the repair method: Rebond the strip if it remains usable, or replace it if the failed backing or strip condition no longer supports reliable adhesion.
- Apply added adhesive when appropriate: If rebonding is suitable, apply added adhesive only where needed, then maintain even pressure during bonding.
- Allow cure conditions: Let the adhesive cure according to its instructions before returning the seal to normal use, as bond strength may depend on cure conditions.
- Review the repair outcome: If the strip still lifts or loses contact after curing, replacement may be the safer repair decision.
This chart shows the three repair paths for loose adhesive weather stripping based on strip and frame condition, helping you choose between rebonding, securing with adhesive, or replacement.
Rebonding a usable seal strip with weatherstrip adhesive
Rebonding a usable seal strip with weatherstrip adhesive may be appropriate when the strip remains undamaged and the bonding area provides a clean surface. The repair also depends on adhesive compatibility with the strip and frame material. Rebonding requires a clean surface and an undamaged strip before bonding again.
- Check the strip condition: Confirm that the usable seal strip is not torn, distorted, or separating before attempting to rebond it.
- Confirm adhesive compatibility: Choose a weatherstrip adhesive that is suitable for the strip and frame materials, as adhesive compatibility may vary between applications.
- Apply adhesive to the application area: Reattach only the loose section so the application area maintains consistent frame contact without extending beyond the original bond.
- Maintain even pressure: Hold the usable seal strip against the frame with steady pressure because consistent contact may improve the bond during rebonding.
- Allow curing: Let the weatherstrip adhesive cure according to its instructions before returning the seal to normal use, as curing conditions may influence bond strength.
Holding the strip in place while the adhesive cures
Holding the strip in place while the adhesive cures helps maintain steady contact while the bond forms. Temporary pressure should keep the strip aligned without causing it to distort or slide. Reliable bond formation depends on steady contact during curing.
- Check alignment: Confirm the strip remains correctly positioned because alignment should not change during the curing period.
- Apply temporary pressure: Use only enough contact pressure to keep the strip in place, as excessive pressure may distort the seal or reduce proper frame contact.
- Avoid movement: Limit movement while the adhesive cures because shifting the strip may interrupt bond formation.
- Use temporary support if needed: Keep the strip stable with a suitable temporary support method when steady contact cannot be maintained without assistance.
- Allow for cure-time variability: Follow the adhesive instructions because cure-time variability depends on the adhesive and application conditions.
Replacing failed self-adhesive tape or foam strips
Replacing failed self-adhesive tape or foam strips may be the appropriate local repair when the failed backing or foam condition is no longer reliable. Replacement is often suitable when the strip is stretched, torn, compressed, or contaminated. These conditions define the local replacement threshold for adhesion failure.
If the failed backing can no longer maintain reliable frame contact or the foam condition has deteriorated, replacing the affected strip may be more appropriate than attempting another repair. The guidance below remains limited to adhesive failure and does not replace a complete weather stripping replacement process.
Replacing failed self-adhesive tape or foam strips: Use the following steps to verify the local replacement branch.
- Check the replacement condition: Replace the strip when the failed backing or foam condition shows stretching, tearing, compression, or contamination that may prevent reliable adhesion.
- Complete old strip removal: Remove the failed self-adhesive tape or worn foam strip carefully so remaining material does not interfere with the new seal.
- Confirm frame readiness: Ensure the frame is ready for the replacement strip because frame readiness may affect adhesive contact.
- Align the new strip: Position the replacement strip with consistent new strip alignment so it follows the intended frame contact without stretching or twisting during installation.
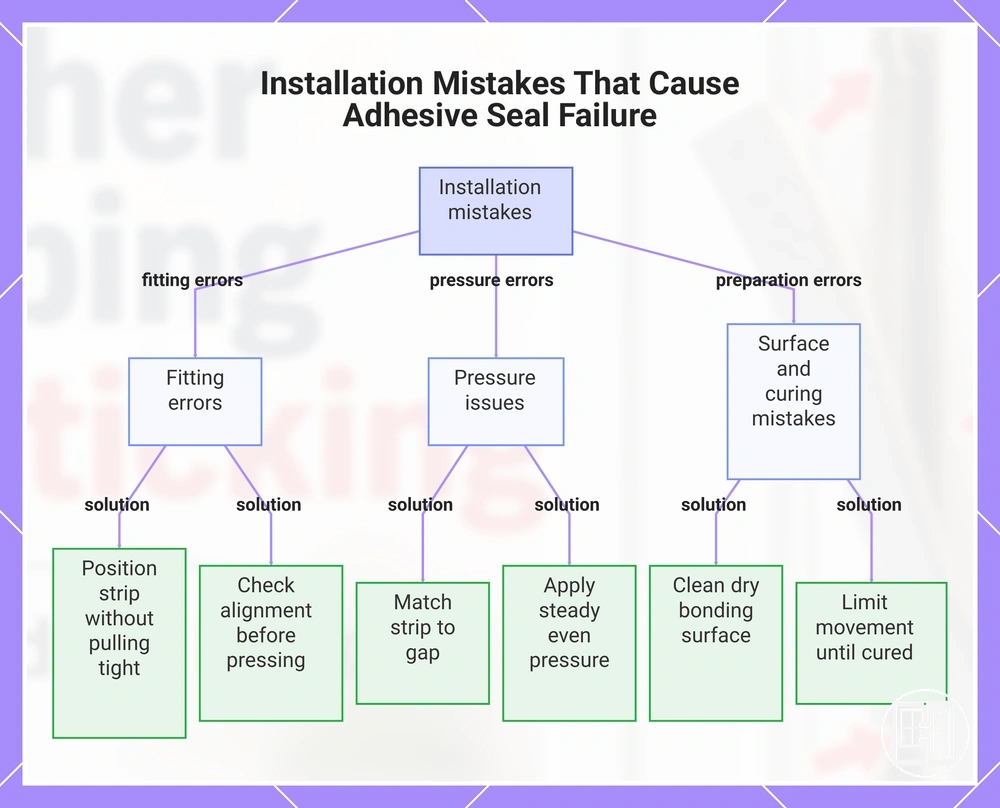
Installation mistakes that cause adhesive seal failure
Installation mistakes can contribute to adhesive seal failure even when the weather stripping and adhesive are otherwise suitable. Placement, pressure, and curing conditions can work together, so small fitting errors may weaken the adhesive bond. These installation mistakes are preventable contributors rather than the only possible cause of failure.
Stretching the strip during fitting, misalignment, or insufficient pressure may reduce consistent contact between the adhesive backing and the frame. Dirty frames, over-compression, early movement before the adhesive cures, or the wrong strip thickness can also contribute to a weak bond, although material condition and the installation environment may also play a role. If surface condition is also a concern, review installation prep mistakes where preparation and installation quality overlap with adhesive performance.
A seal may appear correctly fitted but still develop adhesive failure when curing is interrupted or contact pressure is uneven. By contrast, a visibly misaligned strip may indicate a broader fitting issue rather than an adhesive problem alone. The checklist below focuses only on installation behaviors that may contribute to adhesive seal failure.
Installation mistakes that cause adhesive seal failure: The following checklist links common installation mistakes to possible adhesion outcomes.
- Stretching: Stretching the strip during installation may increase tension, which can contribute to adhesive failure. Prevention: Position the strip without pulling it tight.
- Misalignment: Placement errors may reduce even frame contact and create weak bonding areas. Prevention: Check alignment before pressing the adhesive into place.
- Over-compression: Excessive compression combined with the wrong strip thickness may increase stress on the adhesive and contribute to peeling. Prevention: Match the strip to the intended gap and avoid excessive compression.
- Dirty frames: Contamination may reduce adhesive contact and weaken the bond. Prevention: Prepare a clean, dry bonding surface before installation.
- Insufficient pressure: Uneven or limited contact pressure may leave parts of the adhesive backing unsupported. Prevention: Apply steady, even pressure without distorting the strip.
- Early movement: Moving the strip before curing is complete may interrupt bond formation and lead to a loose seal. Prevention: Limit movement until the adhesive instructions indicate the curing period has been completed.
- Wrong strip thickness: A strip that does not suit the gap may reduce contact or create excessive compression. Prevention: Select a strip thickness that matches the installation conditions.
This chart shows three categories of installation mistakes that can lead to adhesive seal failure and their recommended preventions.
Seal strips that are too thick, tight, or compressed
Seal strips that are too thick, tight, or compressed can increase stress on the adhesive backing and may pull it away from the frame over time. The peeling risk depends on strip thickness, gap size, and the closing pressure applied by the door or sash. Compression force is the local condition to check when diagnosing this type of adhesive seal failure.
Seal strips that are too thick, tight, or compressed: Use the following checklist to verify whether compression force may be increasing peeling risk.
- Gap size: If the strip is too thick for the available gap, compression force may increase each time the door or sash closes.
- Strip thickness: A tight strip may place additional stress on the adhesive backing when the frame remains under continuous pressure.
- Door or sash pressure: High closing pressure may increase adhesive shear and contribute to peeling risk, depending on the frame and closing force.
- Compression memory: A compressed seal that no longer recovers its shape may maintain uneven pressure on the adhesive backing during repeated use.
- Adhesive shear: Repeated pressure load may increase adhesive shear at the bond line and contribute to peeling risk when combined with excessive compression.
Door or window movement that pulls the strip loose
Door movement or window movement can place repeated stress on adhesive weather stripping and may pull the strip loose over time. Rubbing, repeated contact, and shifting can weaken the adhesive bond when combined with strip placement, pressure, or adhesive condition. Movement is one possible source of bond stress rather than the only cause of adhesive seal failure.
- Hinge-side rubbing: Repeated rubbing near the hinge side may wear against the strip and contribute to a weak bond over time.
- Sliding sash movement: Sliding sash movement may increase repeated contact with the strip when strip placement leaves little clearance.
- Frame flex: Small amounts of frame movement may place changing stress on the adhesive backing during normal opening and closing.
- Repeated door slamming: Frequent door slamming may increase bond stress and can contribute to a loose strip when the adhesive is already under load.
- Strip placement: A shifting strip or placement where repeated contact occurs may increase rubbing and make the adhesive backing more likely to pull away from the frame.
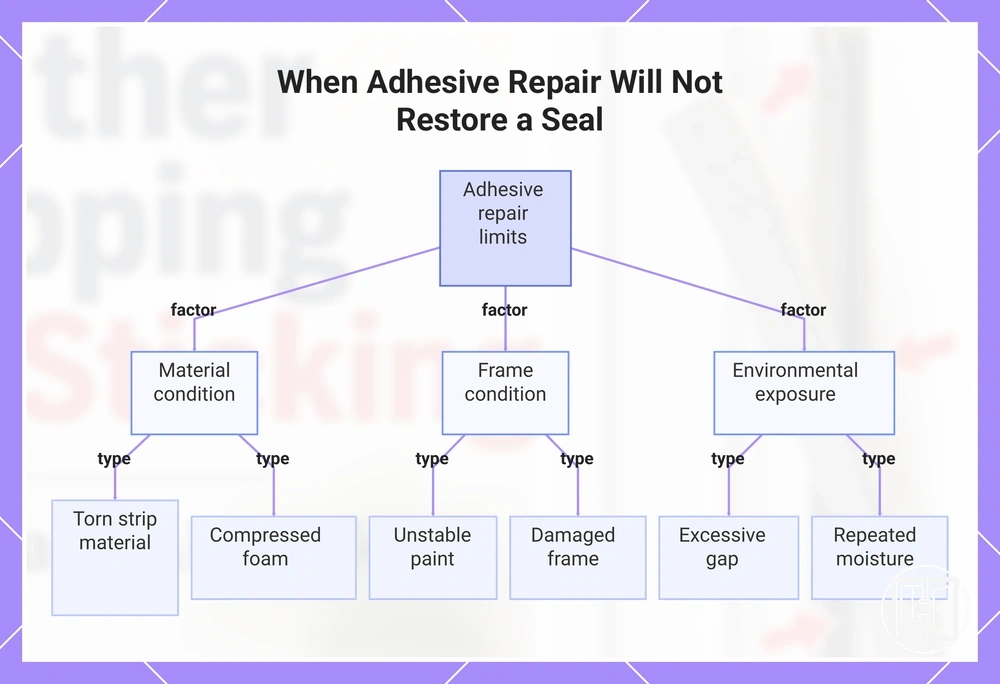
When adhesive repair will not restore the seal
Adhesive repair is unlikely to restore a reliable seal when the strip, frame, or surrounding conditions cannot support a stable bond. Whether repair remains practical depends on material condition, frame condition, and continued exposure to the same stresses. These conditions define the repair limits.
Use the decision checklist below to separate repairable bond problems from conditions that may require replacement or a different seal approach. A weak adhesive bond alone may still be repairable, while torn strip material, compressed foam, unstable paint, damaged frame, excessive gap, repeated moisture, or incompatible adhesive can increase outcome risk. Each condition should be assessed together because repair outcomes depend on the overall condition of the seal and bonding surface rather than the adhesive alone.
- Torn strip: Torn strip material may prevent a reliable seal even if the adhesive bond is restored, so replacement may be more appropriate.
- Compressed foam: Permanently compressed foam may reduce seal reliability after repair because it may no longer maintain consistent contact.
- Unstable paint: Adhesive bonded to unstable paint may fail again if the painted surface separates from the frame.
- Damaged frame: A damaged frame may prevent consistent contact and increase the likelihood of another failed repair.
- Excessive gap: An excessive gap may limit seal performance even when the adhesive bond is restored.
- Repeated moisture: Repeated moisture exposure may continue to weaken the adhesive bond unless the underlying condition changes.
- Incompatible adhesive: An incompatible adhesive may reduce bond quality and increase the replacement threshold when recurring failure continues in the same location.
If recurring failure continues in the same location after appropriate repair, reassess the strip, frame, and surrounding conditions before repeating the repair. If ongoing air movement remains after addressing the adhesive issue, review air leak symptoms because a separate air-leak condition may also require attention.
This chart shows the three main factors that determine when adhesive repair is unlikely to restore a reliable seal: material condition, frame condition, and environmental exposure.
Preventing repeated adhesive failure on weather stripping
Preventing repeated adhesive failure on weather stripping can reduce the chance of the same bond problem returning after the seal has been repaired or replaced. Prevention depends on ongoing inspection and suitable care rather than permanent adhesion. The goal is risk reduction, not a guarantee.
Repeated adhesive failure may occur when surface condition, pressure, or environmental exposure continues to place stress on the adhesive bond. Regular inspection can identify lifted edges before the bond weakens further, while cleaning intervals, moisture control, and avoiding harsh residue may help reduce recurrence. Reducing rubbing and monitoring seasonal stress can also help identify changes that affect seal condition over time. These prevention measures are best organized around surface care, pressure control, and inspection.
- Surface care: Clean the bonding area at suitable intervals and avoid harsh residue because residue may reduce adhesive contact and increase recurrence risk.
- Moisture control: Check for repeated moisture around the seal because ongoing damp conditions may weaken the adhesive bond over time.
- Lifted edges: Inspect for small lifted edges and address them early because they may indicate a weakening bond.
- Pressure control: Watch for rubbing or repeated contact that may place unnecessary stress on the adhesive bond.
- Seasonal stress: Monitor seal condition during seasonal changes because movement and changing conditions may affect the adhesive bond.
- Recurring failure: If the same location continues to fail, reassess the frame, strip type, or installation condition because repeating the same repair may not reduce recurrence.
If recurring adhesive failure continues despite appropriate maintenance checks, reassessing the underlying conditions may be more useful than repeating the same repair. For broader long-term care beyond adhesion-specific prevention, see maintenance prevention.